
Featured

Dents & Dings – Discounted Model Kits & Hobby Items with Box Damage
$56.00 $50.00 ~ $120.00
Bandai HGGQ #12 1/144 RX-78-02 White Gundam Model Kit
$18.20 $15.47
Endless Create SR-01 Shurado Series Byaki MGSD-Style Model Kit
$50.00 $35.00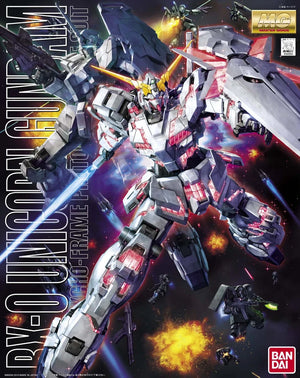
Bandai MG #131 1/100 RX-0 Unicorn Gundam (OVA Ver.) Model Kit
$67.00 $54.27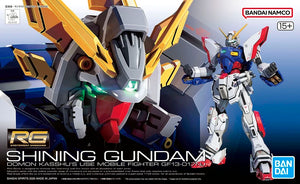
Bandai RG #42 1/144 GF13-017NJ Shining Gundam Model Kit
$43.00 $36.55How to Read Gunpla Instructions: Every Symbol Explained

Originally published January 2023. Updated March 2026 with expanded symbol reference and current resources.
Gundam has been one of the biggest mecha franchises on the planet for over four decades. The shows, the lore, the mobile suit designs - there's a reason this hobby has millions of builders worldwide. But Gundam is a Japanese franchise, and Gunpla is manufactured by Bandai in Japan. Which means the box art, the runner labels, the color guides, and yes, the entire instruction manual - especially on older releases - are printed in Japanese.
The good news? You don't have to learn all 50 Hiragana and Katakana to be able to read any of it. And if you don't know what those are, that's ok too. Bandai designed their manuals to work almost entirely through diagrams, part numbers, and a set of universal symbols that haven't changed much in decades. Once you know what those symbols mean, you can build any kit from Entry Grade to Perfect Grade without understanding a word of Japanese. This guide breaks down every gunpla instruction symbol you'll encounter, explains how the manual is actually structured, and covers the mistakes that trip up first-time builders.
The Manual Layout: What You're Looking At
When that first adrenaline hits you at the moment of opening a new box of Gunpla, hold your urge to start snipping and building. Take a deep breath, have a moment of zen, and flip through the entire manual. It'll only take a few minutes, but you'll thank yourself later.
Here's what you're looking at. Every Bandai Gunpla manual follows roughly the same structure, regardless of grade.
The first page or two will show the completed kit from multiple angles. This is your reference for what the finished build should look like. Some kits show optional configurations here too (different weapons, alternate armor, open or closed hatches).
The parts list page comes next. This is a visual inventory of every runner in the box, labeled with letters (Runner A, Runner B, Runner C, etc.). Each individual part on a runner has a number. So when the manual tells you to grab part A-15, you're looking for runner A, part number 15. The part numbering system is how you'll navigate the entire build, so understanding this page matters.
If you bought an open box kit or you're worried something is missing, check the parts list against what's actually in the box before you start building. Finding out you're missing runner D on step 47 is not a fun experience.

The symbol legend usually appears on one of the first few pages. Not every symbol in the legend will be used in your specific kit - Bandai often greys out the ones that don't apply. Newer kits (roughly 2016 onward) have started including more English alongside the Japanese here, which helps.

The build steps make up the bulk of the manual. Each step shows a diagram of which parts to use and how they fit together. Parts are identified by their runner letter and part number. Arrows show direction. Shaded or highlighted areas show where parts connect. The diagrams are genuinely well-designed - Bandai has been refining these for over 40 years and it shows.
The color guide and decal placement pages are typically at the back. The color guide lists Bandai's recommended paint colors using Mr. Hobby paint codes (and Gundam Color for kits that support it). Decal placement pages show you exactly where each sticker, dry transfer, or waterslide decal goes on the finished model.
Every Gunpla Manual Symbol Explained
Here's the full reference for Bandai's gunpla manual symbols. You'll see these across every grade - HG, RG, MG, PG, and everything in between. The icons haven't changed much over the decades, so this list works whether you're building a new release or digging into a vintage MG from the early 2000s.
Apply Glue Here

A small brush icon. This one is mostly a relic from older kits that required plastic cement to assemble. Modern Gunpla is snap-fit (no glue needed), but you might still see this symbol in certain PG kits or if you're building an older release. If your kit is from the last 15 years and it's not a PG, you can probably ignore this one.
Sticker Number

A rectangle with a folded corner (it looks like a little sticker peeling up) with a number next to it. This tells you which foil sticker to apply at this step. The number corresponds to the sticker sheet included in your kit. Apply stickers as you build, not after. Some stickers have to go on during assembly because the part won't be accessible once the surrounding pieces are in place - the eye sticker on most head units is a classic example. If you wait until the head is fully assembled, you can't reach it. Beyond accessibility, you'll also just forget where half of them go if you save them all for the end.
Decal Number

Similar to the sticker symbol but with a pointed tool icon. This indicates a decal placement. Most current Gunpla releases come with regular stickers and sometimes foil stickers for metallic highlights, but Ver.Ka kits and Premium Bandai kits come with waterslide decals. Older releases sometimes included dry transfer decals, though Bandai has largely moved away from those. The number next to the symbol tells you which decal from the sheet to use. If you're new to waterslides, check out our guide on how to apply water slide decals.
Cut Here (Scissors/Nipper Icon)

A pair of nippers or scissors icon pointing at a specific spot on a part. This is probably the single most common mistake builders make, so pay attention. The icon is specifically telling you which part of the plastic to cut and which part to preserve. Some parts have extra plastic - undergates, small tabs, or excess material - that needs to be trimmed after removal from the runner. But if you cut carelessly or misread where the icon is pointing, you can snip off a peg or connector that's actually structural. Once that peg is gone, the parts won't assemble properly, and you're looking at a glue repair or a replacement part request. Read this symbol carefully every single time.
Assemble This Part First

A circle icon where the white portion is larger than the black portion (sometimes described as a "mostly white" circle). When you see this, complete this sub-assembly before moving on. It usually means the part sits deep inside the build and needs to go in before other parts block access to it. Ignoring this one means backtracking and disassembly later.
Assemble This Part Later

The opposite of the above - a circle where the black portion is larger (a "mostly black" circle). Hold off on this part until after you've completed the surrounding assembly. This typically appears with external armor pieces, weapons, or accessories that attach after the main structure is done.
Attach to the Opposite Side

Two arrows pointing in opposite directions, with part numbers on each side. This means you'll install one part on the left side and a different part on the right side (or front and back). Read the part numbers carefully - they look similar but they're mirror images of each other.
Both Sides Use Identical Parts

A white bar between two inward-pointing arrows. Unlike the symbol above, this means the same part is used on both sides. Build one, then build the exact same thing for the opposite side. One thing that trips people up here: Bandai isn't always consistent with how they number identical parts. Sometimes they're on different runners with the same part number - D1-3 for the left side and D2-3 for the right. Other times they're on the same runner with sequential numbers - D10 for the left and D11 for the right. If you actually inspect those parts, they're the same piece. It's a little confusing, but still less confusing than the icon itself.
Move the Opposite Side As Well

Curved arrows pointing in two directions inside a half-black, half-white box. Common in MG kits during waist or leg assembly. When you move or adjust a part on one side, do the same thing on the other side. This usually relates to joints or frame sections that need to be positioned symmetrically.
Build Specified Number of Parts

An "x2" (or x3, x4, etc.) notation. Repeat this assembly step the indicated number of times. Arms, legs, funnels, wing binders - anything that comes in pairs or multiples will use this. Don't just build one and move on.
Rotate As Indicated

A curved arrow in a circular motion with a degree label (usually 90° or 180°). Rotate the part by the specified amount before or after attaching it. Getting this wrong results in backwards limbs, reversed joints, or parts that don't line up. It's one of the most common beginner mistakes.
Select a Part to Attach

A circle and triangle icon side by side. This means you have a choice between two or more parts. Common examples: beam saber on vs. just the hilt, standard horn vs. commander horn on a Zaku, open hand vs. closed fist. Pick the version you want and move on. You can always swap later if the parts aren't glued.
Pay Attention to Part Orientation

An exclamation mark (!) in a box. This is Bandai saying "seriously, look at the diagram carefully before you snap this in." Parts with this symbol are easy to install backwards or upside-down. Take an extra second to compare your part to the illustration. If you snap something in the wrong way, some parts are nearly impossible to disassemble without a ton of effort, and the risk of breaking the part in the process is extremely high.
Do Not Overtighten Screws

A screw icon with a warning indicator. This is almost exclusively an older kit thing. Early Perfect Grade releases like the PG Wing Zero Custom (which has around 30 screw locations) and the PG Mk-II use metal screws to lock joints and structural connections. The plastic can crack or get stressed if you crank a screw too hard, and a stripped screw hole is basically unfixable without modification. Bandai has moved away from screws in modern kits, so unless you're building a PG from the early 2000s, you probably won't encounter this symbol.
Do Not Cut

A nipper icon with an X through it. The opposite of "cut here." This marks areas that might look like runner gates but are actually structural parts of the piece. Cutting here will damage the part. This shows up on pieces with undergates or unusual runner connections.
Tips for Reading Gunpla Instructions Like a Veteran
Understanding the gunpla instruction symbols is step one. Here are the habits that separate smooth builds from frustrating ones.
Be careful about pre-cutting all your parts. Some experienced builders clip everything off the runners, organize them into labeled containers, and work through the build with loose parts. It's a legitimate method - but it requires knowing what you're doing and having a solid organization system. If you're newer to the hobby, cutting parts as each step calls for them is much safer. You'll always know exactly which piece you're working with, and you won't end up with a pile of similar-looking parts and zero idea which is A-14 and which is A-16.
Follow the step order - at least at first. Bandai's sequence exists for a reason. Parts overlap, joints need specific assembly order, and internal components have to go in before external armor closes around them. Skipping ahead or building out of order almost always means backtracking. That said, once you've got a few builds under your belt, you'll develop a feel for when it's safe to jump around - building weapons first to get them out of the way, or tackling your favorite section when motivation is high. But until you have that instinct, trust the manual's order.
Don't force anything. If a part isn't fitting, you're either using the wrong part or inserting it at the wrong angle. The vast majority of the time, Bandai's tolerances are tight but smooth. If you're straining, stop and re-check the diagram. Forcing a connection can crack pegs, stress joints, or break clips that are extremely hard to fix.
Use the parts list more than you think you need to. The parts list page isn't just for checking if something is missing from an open box kit. It's genuinely one of the most useful pages in the manual during the actual build. Sometimes the step diagram shows a part from one angle, but you're looking at the runner from the top down - the part looks completely different. The parts list shows you exactly where on the runner that piece sits, making it way faster to locate than squinting at the diagram and scanning every runner in the box.
This gets even more important on complex kits with a lot of runners. When you've got fifteen or more runners spread across your workspace, just finding the right runner can eat up time. Some builders label their runners to help navigate, but a quick glance at the parts list will show you what that runner looks like and which parts on it are distinct enough to use as visual identifiers. It sounds like a small thing, but it adds up over a long build.
The color guide is optional but useful. Even if you're not painting, the color guide at the back of the manual shows you what colors Bandai intended for each section. This is handy for placing stickers accurately or deciding if you want to paint-correct any off-color parts later.
Lost Your Manual? Here's Where to Find It
Bandai now hosts over 600 official Gunpla instruction manuals online at manual.bandai-hobby.net. You can search by grade, series, or release date, and the manuals are available as PDF files viewable on any device. Coverage spans kits released from the mid-2000s through current releases.
For older kits or third-party model kits not covered by Bandai's archive, the community has you covered. Mech9.com offers English translations of color guides and construction notes. Dalong.net has scanned manuals for nearly every retail Gunpla kit ever made. Japanese hobby retailer 1999.co.jp also photographs manual pages as part of their product listings, which can be a lifesaver for obscure kits.
New to Gunpla and not sure which kit to start with? Check out our Gunpla Grades Explained guide to find the right grade for your skill level, or browse our beginner-friendly kit recommendations.