Featured
30MM 1/144 EXM-A9a Spinatio (Army Specification)
$17.00 $14.45
PG 1/60 Perfect Grade Unicorn Gundam 02 Banshee Norn
$260.00 $234.00
HG 1/144 HGUC RX-77-2 Gun Cannon
$17.00 $13.09
MG 1/100 XXXG-01W Wing Gundam EW Ver.
$41.00 $34.85
Dents & Dings – Discounted Model Kits & Hobby Items with Box Damage
$8.06 $11.00 ~ $180.004 Mistakes New Gundam Gunpla Model Kit Builders Make and How to Avoid Them
Building Gunpla, or Gundam Plastic Model Kit, is a passion that’s captured the imagination of hobbyists worldwide. These detailed models offer endless opportunities for creativity and customization, making them both fun and challenging. For those just getting into Gundam Gunpla, the excitement of starting a build can sometimes lead to common mistakes that affect the final outcome. In this article, we’ll break down the most frequent errors that new Gunpla builders make and share practical tips to help you avoid them. With the right approach, your builds can look polished and professional from day one.
1. Purchasing the Wrong Tools
Selecting the right tools is essential for a smooth and enjoyable Gunpla building experience. Many beginners, especially those who may have built scale models in the past, assume that traditional model tools like plastic cement are necessary for Gunpla. This can lead to confusion and unnecessary expenses.
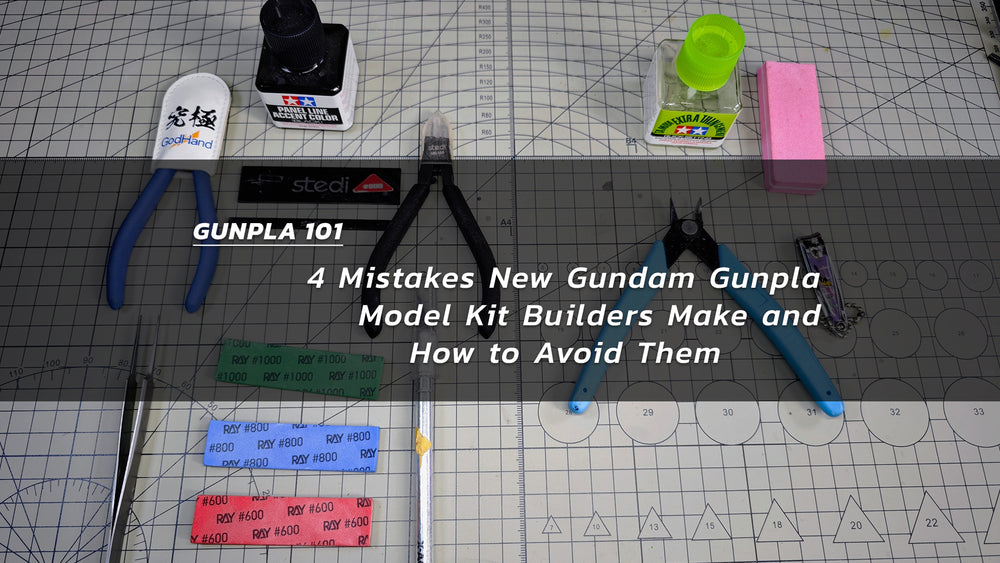
Common Mistake: New builders often purchase items such as plastic cement, thinking it is essential for assembling their Gunpla kits. While plastic cement is used for traditional scale models that require glue, Gunpla models are designed as snap-fit kits that don’t need adhesive. Additionally, opting for household tools like scissors, wire cutters, or even old nail clippers instead of proper hobby tools can result in poor cuts and damage to the parts. While nail clippers were once a popular makeshift tool among early builders, they often leave uneven cuts and stress marks.
Solution: To get started with Gunpla, invest in a few essential tools. High-quality hobby nippers are crucial for cleanly cutting parts from the sprue without stress marks. A precision hobby knife helps remove any leftover nubs, and sanding sticks ensure a smooth finish. These basic tools are more than enough for beginners and will make the building process easier and more enjoyable. For the best selection of essential tools, check out our tool collection.

On the right: Tamiya Quick Setting Cement, Nail Polish/Sanding Block, Wire Cutter, Nail Clipper
2. Improper Part Removal Techniques
The technique you use to detach parts from the sprue plays a crucial role in the overall quality of your Gunpla model. Poor removal practices can cause visible stress marks, rough edges, or even breakage, all of which can negatively impact the polished appearance you're aiming for.
Common Mistake: Many beginners make the mistake of twisting, yanking, or cutting parts off the sprue in ways that can cause damage. Twisting or pulling parts with too much force often results in stress marks, cracks, or chips in the plastic. Some also use tools like nail clippers or household scissors, which tend to leave rough, jagged edges or uneven cuts. These methods, though once common, are not ideal for model building because they create imperfections that are difficult to fix later. Another common error is cutting too close to the part. When beginners cut too near the sprue attachment point, they can accidentally overcut the piece, damaging the part or leaving uneven surfaces. This can also create a visible nub or rough edge that is hard to smooth out. Additionally, using improper techniques can lead to breakage, particularly with delicate parts, affecting the fit and overall quality of the final model.
Solution: To avoid these issues, use a good pair of hobby nippers to carefully cut parts from the sprue. Start by making a cut a little away from the part, leaving a small nub. Then, use the nippers to trim the remaining nub down to the part, making sure to do it slowly and carefully. Afterward, smooth out any rough spots with a precision knife or a sanding stick. This method ensures that your parts are clean and smooth, with no visible nubs or rough edges, giving your model a much more polished, professional look.
3. Overlooking Part Identification
Gunpla kits often include parts that look nearly identical, but are designed for specific sides (left vs right), orientations (top vs bottom), or specific locations on the model. If these parts are used incorrectly, they can cause assembly issues or result in a misaligned, uneven build. While they may seem interchangeable at first glance, subtle differences can make a big impact on the fit and overall look of the model.
Common Mistake: Many new builders overlook the subtle differences between parts that may look nearly identical but are designed for specific sides (left vs right) or orientations (top vs bottom). For example, parts such as left and right arms may appear similar, but they have distinct cutouts or pegs that ensure they fit only in the correct spots. Trying to force a part into the wrong orientation or position can lead to misalignment, difficulty with assembly, or even damage to the parts.
Solution: To avoid this mistake, carefully check the orientation of each part before attaching it. Look for small differences such as cutouts, pegs, or unique shapes that indicate the part's intended position, like left vs right or top vs bottom. Always refer to the manual to confirm the correct orientation and placement, as it often provides helpful clues. If you're unsure, dry-fit the parts first to make sure they align properly without forcing them. Additionally, consider organizing parts by left and right or top and bottom to help prevent confusion and ensure a smooth assembly process.
4. Choosing the Wrong Gunpla Grade
Gunpla kits come in different grades, which refer to the complexity and level of detail in the build. These grades are typically divided into High Grade (HG), Real Grade (RG), Master Grade (MG), and Perfect Grade (PG). Each grade varies in terms of detail, articulation, and assembly difficulty. For beginners, it’s important to choose the right grade to avoid frustration. Higher-grade kits, like Master Grade (MG) and Perfect Grade (PG), are known for having a lot more parts, intricate details, and more advanced assembly techniques. While these models are visually stunning and offer greater articulation, they can be more time-consuming and challenging, especially if you're new to the hobby.
Common Mistake: Many new builders choose a kit based on their favorite Gundam from an anime series without fully understanding the differences between the grades. For example, a customer of ours who grew up watching Gundam Wing chose the Perfect Grade (PG) Gundam Wing Zero Custom as his first build, thinking that a larger and more expensive kit would offer a better, more impressive result. Unfortunately, he was not aware of the complexity involved in assembling a PG kit, and it ended up being far more challenging than expected for a beginner. Without prior experience, it can be difficult to appreciate that higher grades like PG are much more intricate and demanding, often requiring advanced skills and a considerable investment of time.
Solution: To avoid this, start with a High Grade (HG) kit, which is an excellent entry point into the hobby. HG kits offer a wide variety of Gundam models, making them perfect for beginners who want to build their favorite designs without dealing with the complexity of higher-grade kits. In fact, HG has the most Gundam variations, so you're sure to find something that appeals to you. These kits are easier to assemble but still provide great detail and articulation, giving you a satisfying result with less effort. As you gain more experience, you can step up to Real Grade (RG) or Master Grade (MG) kits for more advanced features and complexity. If you’re looking for an ultimate challenge, Perfect Grade (PG) kits are larger, more intricate, and offer highly detailed models, ideal for builders who are ready for a more demanding project. Starting with an HG kit ensures you’ll have an enjoyable experience as you learn the ropes of Gunpla.
Building Gunpla is a rewarding and creative process, but avoiding common mistakes can make all the difference in achieving a polished final model. By using the right tools, practicing proper part removal techniques, carefully identifying parts, and choosing the right grade based on your experience, you’ll enjoy a smoother, more satisfying build. Focusing on these key aspects not only improves your experience but also leads to better results. With patience and attention to detail, you’ll be creating impressive Gunpla models in no time!
Happy Building!
— The LAScaleModel.com
